
1. 简介

用户可通过 Wear OS 功能块轻松访问所需的信息和操作,顺利完成各种任务。只需在表盘上轻轻滑动一下,用户即可查看最新的天气预报或启动定时器。
功能块作为系统界面的一部分运行,而不是在其专属的应用容器中运行。我们使用 Service 来描述功能块的布局和内容。系统界面随后会根据需要渲染功能块。
实践内容
您将为一款即时通讯应用构建功能块,在其中显示近期对话。通过该功能块界面,用户可以跳转到以下三个常见任务:
- 打开对话
- 撰写新消息
学习内容
在此 Codelab 中,您将学习如何编写自己的 Wear OS 功能块,包括如何执行以下操作:
- 创建
TileService - 在设备上测试功能块
- 在 Android Studio 中预览功能块的界面
- 为功能块开发界面
- 添加图片
- 处理互动
前提条件
- 对 Kotlin 有基本的了解
2. 准备工作
在此步骤中,您将设置环境并下载起始项目。
所需条件
- Android Studio Koala 功能更新 | 2024.1.2 Canary 1 或更高版本
- Wear OS 设备或模拟器
如果您不熟悉 Wear OS 的用法,最好先阅读此快速入门指南,然后再开始操作。文中介绍了如何设置 Wear OS 模拟器,以及如何在系统中导航。
下载代码
如果您已安装 git,只需运行以下命令,即可克隆此代码库中的代码。
git clone https://github.com/android/codelab-wear-tiles.git
cd codelab-wear-tiles
如果您未安装 git,可以点击下方按钮下载此 Codelab 的全部代码:
在 Android Studio 中打开项目
在“Welcome to Android Studio”窗口中,选择  Open an Existing Project 或依次选择 File > Open,然后选择文件夹 [Download Location]。
3. 创建基本功能块
功能块的入口点是功能块服务。在此步骤中,您将注册一项功能块服务,并定义该功能块的布局。
HelloWorldTileService
实现 TileService 的类需要指定两个方法:
onTileResourcesRequest(requestParams: ResourcesRequest): ListenableFuture<Resources>onTileRequest(requestParams: TileRequest): ListenableFuture<Tile>
第一个方法会返回一个 Resources 对象,它的主要功能是将字符串 ID 映射到我们在功能块中使用的图片资源。
第二个方法会返回功能块的说明(包括其布局)。我们将在此函数中定义功能块的布局以及数据与功能块的绑定方式。
从 start 模块打开 HelloWorldTileService.kt。您将进行的所有更改均位于此模块中。我们还提供了一个 finished 模块,供您查看此 Codelab 的成果。
HelloWorldTileService 会扩展 SuspendingTileService,后者是一个来自 Horologist Tiles 库的对 Kotlin 协程友好的封装容器。Horologist 是 Google 的一组库,旨在为 Wear OS 开发者提供开发者通常需要但 Jetpack 尚未提供的功能。
SuspendingTileService 提供了两个挂起函数,这两个挂起函数是 TileService 中的函数的协程版本:
suspend resourcesRequest(requestParams: ResourcesRequest): Resourcessuspend tileRequest(requestParams: TileRequest): Tile
如需详细了解协程,请参阅 Android 上的 Kotlin 协程文档。
HelloWorldTileService 尚未完成。我们需要在清单中注册服务,还需要为 tileLayout 提供实现。
注册功能块服务
在清单中注册功能块服务后,即可使其显示在可用功能块列表中,供用户自行添加。
在 <application> 元素内添加 <service>:
start/src/main/AndroidManifest.xml
<service
    android:name="com.example.wear.tiles.hello.HelloWorldTileService"
    android:icon="@drawable/ic_waving_hand_24"
    android:label="@string/hello_tile_label"
    android:description="@string/hello_tile_description"
    android:exported="true"
    android:permission="com.google.android.wearable.permission.BIND_TILE_PROVIDER">

    <intent-filter>
        <action android:name="androidx.wear.tiles.action.BIND_TILE_PROVIDER" />
    </intent-filter>

    <!-- The tile preview shown when configuring tiles on your phone -->
    <meta-data
        android:name="androidx.wear.tiles.PREVIEW"
        android:resource="@drawable/tile_hello" />
</service>
当首次加载功能块时,或者加载功能块出错时,系统将使用图标和标签(作为占位符)。末尾的元数据定义了当用户添加功能块时在轮播界面中显示的预览图片。
定义功能块布局
HelloWorldTileService 有一个名为 tileLayout 的函数,其正文为 TODO()。现在,我们将其替换为一个实现,并在其中定义功能块的布局:
start/src/main/java/com/example/wear/tiles/hello/HelloWorldTileService.kt
fun tileLayout(
    context: Context,
    deviceConfiguration: DeviceParametersBuilders.DeviceParameters,
    message: String,
) =
    materialScope(
        context = context,
        deviceConfiguration = deviceConfiguration,
        allowDynamicTheme = false,
    ) {
        primaryLayout(mainSlot = { text(message.layoutString) })
    }
这是您创建的第一个 Wear OS 功能块!让我们安装此功能块,看看其外观如何。
4. 在设备上测试功能块
在运行配置下拉菜单中选择 start 模块后,即可在设备或模拟器中安装应用(start 模块),然后像用户一样手动安装功能块。
不过,Android Studio 提供了一个快捷方式来实现此目的:点按边线中的“运行服务”图标 (▷),然后选择“Run ‘HelloWorldTileService'”,即可在已连接的设备上安装并启动卡片。

选择“Run 'HelloWorldTileService'”以在已连接的设备上构建和运行卡片。它应如以下的屏幕截图所示。
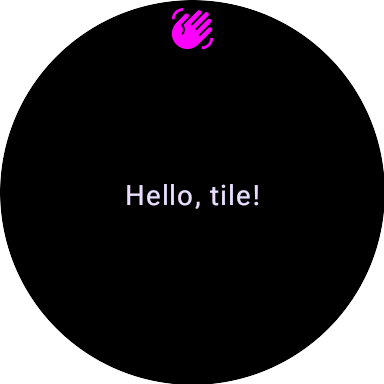
显示屏顶部显示的“挥手”图标由系统提供。如需更改该属性,请在清单中修改卡片的 <service> 元素的 android:icon 属性。
为方便起见,此过程还将创建“HelloWorldTileService”运行配置,以供日后使用。

5. 添加预览函数
我们可以在 Android Studio 中预览卡片界面。这样可以缩短开发界面时的反馈环,从而加快开发速度。
在 HelloWorldTileService.kt 文件末尾,为 HelloWorldTileService 添加功能块预览。
start/src/main/java/com/example/wear/tiles/hello/HelloWorldTileService.kt
@Preview(device = WearDevices.SMALL_ROUND, name = "Small Round")
@Preview(device = WearDevices.LARGE_ROUND, name = "Large Round")
internal fun helloLayoutPreview(context: Context): TilePreviewData {
    return TilePreviewData {
        TilePreviewHelper.singleTimelineEntryTileBuilder(
            helloLayout(context, it.deviceConfiguration, "Hello, preview tile!")
        )
            .build()
    }
}
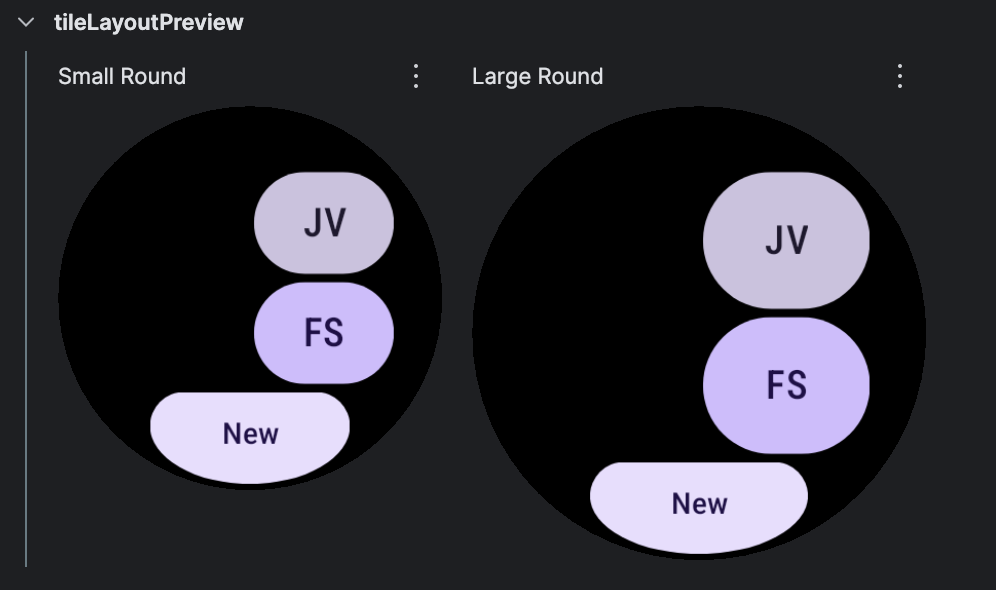
使用“拆分”编辑器模式查看功能块预览:

请注意,代码中未使用 @Composable 注释。尽管功能块使用与可组合函数相同的预览界面,但功能块不使用 Compose,也不是可组合项。
6. 构建消息功能块
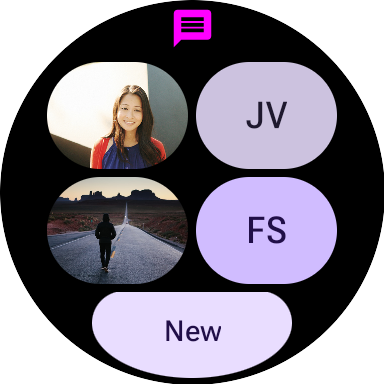
我们要构建的消息功能块更像是一个真实的功能块。与 HelloWorld 示例不同,此示例演示了 Material 3 Expressive 组件,显示图片并处理互动以打开应用。
MessagingTileService
MessagingTileService 扩展了我们之前看到的 SuspendingTileService 类。
7. 添加界面组件
ProtoLayout 库提供预构建的组件和布局,让您可以创建支持适用于 Wear OS 的最新 Material 3 Expressive 设计的卡片。
将 Tiles Material 依赖项添加到 build.gradle 文件中:
start/build.gradle
implementation "androidx.wear.protolayout:protolayout-material3:$protoLayoutVersion"
将布局代码添加到 tileLayout() 函数中,作为 materialScope() 函数的正文。这会创建一个由两行(每行两个按钮)和一个边缘按钮组成的布局。
找到“TODO() // Add primaryLayout()" 行,并将其替换为以下代码。
start/src/main/java/com/example/wear/tiles/messaging/tile/Layout.kt
primaryLayout(
    mainSlot = {
        // This layout code assumes "contacts" contains at least 4 elements, for sample code
        // that can handle an arbitrary number of contacts, and also shows different numbers
        // of contacts based on the physical screen size, see
        // <https://github.com/android/wear-os-samples/tree/main/WearTilesKotlin>.
        Column.Builder()
            .apply {
                setWidth(expand())
                setHeight(expand())
                addContent(
                    buttonGroup {
                        buttonGroupItem { contactButton(contacts[0]) }
                        buttonGroupItem { contactButton(contacts[1]) }
                    }
                )
                addContent(DEFAULT_SPACER_BETWEEN_BUTTON_GROUPS)
                addContent(
                    buttonGroup {
                        buttonGroupItem { contactButton(contacts[2]) }
                        buttonGroupItem { contactButton(contacts[3]) }
                    }
                )
            }
            .build()
    },
    bottomSlot = {
        textEdgeButton(
            onClick = clickable(), // TODO: Launch new conversation activity
            labelContent = { text("New".layoutString) },
        )
    },
)
同一文件中的 contactButton() 函数会创建各个联系人按钮。如果联系人有关联的图片,该图片会显示在按钮上。否则,系统会使用联系人的姓名首字母。
此时,您可能会注意到,虽然总体布局正确无误,但图片却缺失了:
如果您将卡片部署到设备,也会看到相同的内容:

在下一步中,我们将修复缺失的图片。
8. 添加图片
大体上讲,功能块由两部分组成:布局(通过字符串 ID 引用资源)和资源本身(可以是图片)。
目前,我们的代码提供的是布局,而不是资源本身。为了修正预览,我们需要提供图片“资源”。为此,请找到“TODO: Add onTileResourceRequest”,并将以下代码添加为 TilePreviewData() 的额外已命名参数:
start/src/main/java/com/example/wear/tiles/messaging/tile/Layout.kt
// Additional named argument to TilePreviewData
onTileResourceRequest = { resourcesRequest ->
    Resources.Builder()
        .setVersion(resourcesRequest.version)
        .apply {
            contacts.forEach {
                if (it.avatarSource is AvatarSource.Resource) {
                    addIdToImageMapping(
                        it.imageResourceId(),
                        it.avatarSource.resourceId
                    )
                }
            }
        }
        .build()
}
现在,图片应该会显示在预览中:

不过,如果将卡片部署到设备,图片将会缺失。如需解决此问题,请将 Service.kt 中的 resourcesRequest() 函数替换为以下代码:
start/src/main/java/com/example/wear/tiles/messaging/tile/Service.kt
override suspend fun resourcesRequest(
    requestParams: ResourcesRequest
): Resources {
    // resourceIds is a list of the ids we need to provide images for. If we're passed an empty
    // list, set resourceIds to all resources.
    val resourceIds =
        requestParams.resourceIds.ifEmpty {
            contacts.map { it.imageResourceId() }
        }

    // resourceMap maps (tile) resource ids to (Android) resource ids.
    val resourceMap =
        contacts
            .mapNotNull {
                when (it.avatarSource) {
                    is AvatarSource.Resource ->
                        it.imageResourceId() to
                            it.avatarSource.resourceId
                    else -> null
                }
            }
            .toMap()
            .filterKeys {
                it in resourceIds
            } // filter to only the resources we need

    // Add images in the resourceMap to the Resources object, and return the result.
    return Resources.Builder()
        .setVersion(requestParams.version)
        .apply {
            resourceMap.forEach { (id, imageResource) ->
                addIdToImageMapping(id, imageResource)
            }
        }
        .build()
}
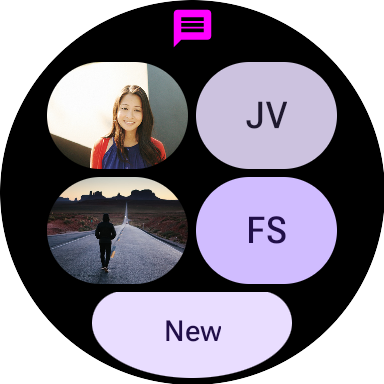
现在,在将卡片部署到设备时,系统也会显示图片:
在下一步中,我们将处理各个元素的点击操作。
9. 处理互动
我们可以在功能块上实现的最为实用的一项操作就是提供到关键用户历程的快捷方式。这与仅打开应用的应用启动器不同 - 在此处,我们有空间提供一些上下文快捷方式,让用户能够快捷访问应用中的特定屏幕。
到目前为止,我们针对条状标签和每个按钮均使用了由无参数 clickable() 提供的虚拟操作。对于不支持互动的预览,这种方式效果不错。现在,让我们来看看如何为这些元素添加操作。
LaunchAction
LaunchAction 可用于启动 activity。我们来修改 Layout,以便用户只需点按“New”按钮即可发起“new conversation”用户体验历程。
找到“TODO: Launch new conversation activity”行,并将 clickable() 替换为:
start/src/main/java/com/example/wear/tiles/messaging/tile/Layout.kt
clickable(
    id = "new_button",
    action =
        launchAction(
            ComponentName(
                "com.example.wear.tiles",
                "com.example.wear.tiles.messaging.MainActivity",
            ),
            mapOf(
                MainActivity.EXTRA_JOURNEY to
                    ActionBuilders.stringExtra(
                        MainActivity.EXTRA_JOURNEY_NEW
                    )
            ),
        ),
)
重新部署该功能块。现在,点按“New”后,系统将启动 MainActivity 并开始“new conversation”用户体验历程,而不是什么都不做:

同样修改 Layout,以便只需点按联系人按钮即可与特定用户发起对话。
找到“Launch open conversation activity”一行,并将 clickable() 替换为:
start/src/main/java/com/example/wear/tiles/messaging/tile/Layout.kt
clickable(
    id = contact.id.toString(),
    action =
        launchAction(
            ComponentName(
                "com.example.wear.tiles",
                "com.example.wear.tiles.messaging.MainActivity",
            ),
            mapOf(
                MainActivity.EXTRA_JOURNEY to
                    ActionBuilders.stringExtra(
                        MainActivity
                            .EXTRA_JOURNEY_CONVERSATION
                    ),
                MainActivity.EXTRA_CONVERSATION_CONTACT to
                    ActionBuilders.stringExtra(
                        contact.name
                    ),
            ),
        ),
)
重新部署该功能块。现在,点按联系人后,系统会与其发起对话,而不是什么都不做:

10. 恭喜
恭喜!您已了解如何构建适用于 Wear OS 的功能块!
后续操作
如需了解详情,请参阅 GitHub 上的 Golden Tiles 实现、Wear OS 功能块指南和设计准则。